|
|
So
You're Ready For A Nano Reef?
 I
must admit I was a bit leary
to try the jump to Saltwater tanks because since I was a kid,
people always told me that Saltwater tanks are a pain, or
difficult or both. Because of this, I always stayed on the
Freshwater side of the store. Now...... I
must admit I was a bit leary
to try the jump to Saltwater tanks because since I was a kid,
people always told me that Saltwater tanks are a pain, or
difficult or both. Because of this, I always stayed on the
Freshwater side of the store. Now......
After many months of having this website built, we have received
quite alot of email asking us various questions about the
setup and maintenance routines for our Nano Reef. This page
will be dedicated to the Setup and Maintenance of our AGA
7 Gallon MiniBow Nano Reef.
Hopefully this page will help others in their quest for information
on different Nano Reef setups. If you do not see something
pertaining to our Setup and Maintenance on this page that
you feel should be listed here, please feel free to contact
us with your questions or ideas.
|
|
|
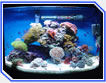
Choosing
The Tank
 When
I started doing research about Nano Reefs back before our
tank had been started, I found that people were using all
different sized tanks up to 30 gallons for Nano Reefs. Our
Nano Reef is kept in the bed room, so the main issues to overcome
were the size, the look (outside look), and sound (or lack
of it). My decision to go with an A.G.A. Minibow 7 Gallon
tank was based mainly on these points initial points of concern
as well as basic preferance. I really liked the way that the
Minibow looked setup as a Nano Reef on other peoples websites.
I also liked the fact that the Minibow could be setup without
the clutter of any additional equipment such as a sump, skimmer,
or large fans. This helps keep the actual system itself looking
very nice and compact. When
I started doing research about Nano Reefs back before our
tank had been started, I found that people were using all
different sized tanks up to 30 gallons for Nano Reefs. Our
Nano Reef is kept in the bed room, so the main issues to overcome
were the size, the look (outside look), and sound (or lack
of it). My decision to go with an A.G.A. Minibow 7 Gallon
tank was based mainly on these points initial points of concern
as well as basic preferance. I really liked the way that the
Minibow looked setup as a Nano Reef on other peoples websites.
I also liked the fact that the Minibow could be setup without
the clutter of any additional equipment such as a sump, skimmer,
or large fans. This helps keep the actual system itself looking
very nice and compact.
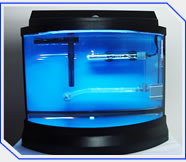
To prepare the tank for water, I cutout
a space in the plastic tank lid so the Hang On Back filter
(HOB filter) would fit on the tank, and put a permanent background
on the tank as well. The tank lid has some prefab slats that
can easily be pulled out that are meant to be spots for the
HOB Filter, but I cut out my own custom fit slot using a Dremel
Tool. I wanted good tank coverage so if a fish ever jumped
on us, it would end up back in the tank instead of on the
floor.
(note: so far no jumpers.)
To put a permanent background color
on the tank, I went with Krylon spray paint which I purchased
at WalMart. Krylon spraypaint is safe to paint on vinyl and
rubber, so I figured this would be the safest on if it were
to get onto the aquarium silicon. I made sure to mask off
the tank very well before painting, and ended up putting on
4 or 5 coats of paint. Be careful after you paint the tank,
because it can scratch pretty easily. Don't ask how I know
that, grrr.
Minibow Lighting
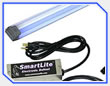 After
choosing our tank, the next major consideration was lighting.
I went with the Custom Sea Life 32watt Smartlight Retrofit
Kit that costs right around 40$-50$, and seemed to be a proven
bulb/ballast combination in other peoples experiences. The
Retrofit kit fits very nicely into the existing lightstrip
that the Minibow comes with. Putting the new lighting into
the lightstrip was extremely easy. After
choosing our tank, the next major consideration was lighting.
I went with the Custom Sea Life 32watt Smartlight Retrofit
Kit that costs right around 40$-50$, and seemed to be a proven
bulb/ballast combination in other peoples experiences. The
Retrofit kit fits very nicely into the existing lightstrip
that the Minibow comes with. Putting the new lighting into
the lightstrip was extremely easy.
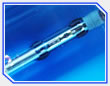
The most difficult part was drilling holes into the reflector
to make the holes on the reflector line up with the screw
holes on the lightstrip. The way I accomplished marking the
holes was to put some of Liza's nail polish onto the screw
posts in the lightstrip. I then put the reflector into the
lightstrip as it was to sit making sure to push down in the
area of the screw posts. When you pull up the reflector, there
will be nail polish marks where to drill the holes.
Dealing With Heat Issues Caused By Lighting
 After
installing our new lighting and trial running our tank with
water in it, I found that the tank was running fairly hot.
To help decrease heat, the first thing I did was remove the
glass between the light and the water. This was easily done
using an exacto knife to seperate the glass from the silicone
that holds it into the canopy. Removing the glass helps both
with bringing down the temperature, as well as promoting gas
exchange by evaporation which is very important in a tank
this size. After
installing our new lighting and trial running our tank with
water in it, I found that the tank was running fairly hot.
To help decrease heat, the first thing I did was remove the
glass between the light and the water. This was easily done
using an exacto knife to seperate the glass from the silicone
that holds it into the canopy. Removing the glass helps both
with bringing down the temperature, as well as promoting gas
exchange by evaporation which is very important in a tank
this size.
I performed one other proactive measure concerning the heat
issue in our Nano Reef. As an added precaution, to keep the
tank temperature down to 80 in the summertime, I added a small
computer fan directly to the back of the lightstrip. The fan
that I decided on was from Radio Shack and the part number
for reference is CAT NO 273-240. I am happy with this fan,
but it is a little bit loud, in fact, it sounds like a computer....
Go figure. To run the fan, I also picked up a basic AD/DC
converter.
The fan and lighting is all on the same powerstrip which is
then running on a timer. This insures that when the lights
come on in the morning, the fan comes on as well. At night
when the lights turn off, the fan turns off as well.
Lighting
Schedule
Our lighting
is run on a basic timer for 12.5 hours on and 11.5 hours off.
This lighting regimen has worked well for our Nano Reef and
has produced great growth rates with our corals.
Other Heat
Issues
 In
the winter, nights get much colder than the reef ever should,
so we have installed a Tronic 50watt fully submersible heater.
The heater was set to temp (80 Degrees Farenheit) during the
initial test running of the tank. I have used Tronic brand
heaters for quite some time with Freshwater Tanks and have
had only good experiences with them. I have not read any bad
press on the various reef boards about these heaters either. In
the winter, nights get much colder than the reef ever should,
so we have installed a Tronic 50watt fully submersible heater.
The heater was set to temp (80 Degrees Farenheit) during the
initial test running of the tank. I have used Tronic brand
heaters for quite some time with Freshwater Tanks and have
had only good experiences with them. I have not read any bad
press on the various reef boards about these heaters either.
Water
Movement
 To
move water in our Nano Reef, I have employed a MiniJet404
Powerhead and a Whisper 10-15 HOB Filter. The MiniJet404 is
working well for us and is very quiet. These powerheads are
adjustable flow, but I have it running on the highest setting
possible. The MiniJet 404 is rated to flow at 108 gallons
per hour. It sounds like alot for 7 gallons of water, but
it really is not that strong of a flow. The HOB Filter and
Powerhead are setup at opposite ends of the tank so their
currents intersect in the center of the tank. This seems to
create some nice haphazard currents. To
move water in our Nano Reef, I have employed a MiniJet404
Powerhead and a Whisper 10-15 HOB Filter. The MiniJet404 is
working well for us and is very quiet. These powerheads are
adjustable flow, but I have it running on the highest setting
possible. The MiniJet 404 is rated to flow at 108 gallons
per hour. It sounds like alot for 7 gallons of water, but
it really is not that strong of a flow. The HOB Filter and
Powerhead are setup at opposite ends of the tank so their
currents intersect in the center of the tank. This seems to
create some nice haphazard currents.
The Whipser HOB Filter is running with no filter media and
is used for water movement alone. In order to create more
of a waterfall effect and to help with surface scum in the
tank, I have added length of tubing that is around 1"
thick to go between the rim of the tank and the HOB filter.
This extra 1" of height helps water movement and seems
to keep the surface scum a non issue. note:
I have also heard of people cutting the outflow slide on the
HOB filter to create more of a waterfall.
Filtration
 To
handle filtration in our Nano Reef, we are using Fiji Live
Rock, Live Sand, and Diligent Water Changes (see maintaining
our Nano Reef). We chose almost 9lbs of premium cured Fiji
Liverock from our (LFS) Local Fish Store and around 8lbs of
Live Sand. We also put down 2lbs of Aragonite beneath the
live sand because we happened to have some on hand. I learned
about using Live Rock for filtration from the various reef
boards and people's experiences. This method of filtration
has worked very well for us. To
handle filtration in our Nano Reef, we are using Fiji Live
Rock, Live Sand, and Diligent Water Changes (see maintaining
our Nano Reef). We chose almost 9lbs of premium cured Fiji
Liverock from our (LFS) Local Fish Store and around 8lbs of
Live Sand. We also put down 2lbs of Aragonite beneath the
live sand because we happened to have some on hand. I learned
about using Live Rock for filtration from the various reef
boards and people's experiences. This method of filtration
has worked very well for us.
|
|
Daily Routine
Liza is in charge of daily freshwater topoffs gaining her
the friendly nickname of "auto topoff unit" which
she has definitely earned over the months since our Nano has
been setup. We use RO/DI water that we purchase by the gallon
at our Local Fish Store.
Weekly Routine
Every week I perform a 1 gallon Saltwater change on the tank
using premixed Saltwater that we purchase by the gallon at
our Local Fish Store. Our Local Fish Store mixes their RO/DI
water with Tropic Marin salt mix, and I would recommend this
salt to others since it has worked so well in our tank. Our
salt is mixed to a specific gravity of 1.024. When removing
the 1 gallon of water from the tank, I vacuum out Planaria,
Coralline eating Starfish, and excess deitrous if it is obvious.
The vacuum I made is simply a piece of Rigid Airline Tubing
and a piece of regular Airline Tubing as a small aquarium
vacuum. The rigid Airline Tubing is great for vacuuming planaria
from rocks.
To get the replacement water closer to the tank temperature,
I just put the gallon container in a sink with some hot water
in it. After I am done with the tank vacuuming, the water
temperature has usually come up nicely in the gallon container.
Also, weekly we decide if anything needs pruning. Corals and
Macroalgae need pruning in such a small environment. Xenia
for instance is almost invasive by nature since it grows so
quickly and needs to be pruned regularly so it will not take
over neighboring corals. If Liza is around, I always ask her
very nicely to hold the light up for me when pruning the tank
or moving corals. I also remind her every time she holds my
life in her hands.
Feeding Routines
We feed our Clownfish a couple times a day with small food
pellets (not sure on the maker) and also the red type of frozen
Formula One every few days to switch it up. We feed a small
pinch of the Frozen Formula One food directly into the tank
and it gets around. We purchase the Frozen Formula One as
a flat piece in a bag so it is easy to pinch off small amounts.
We received the small food pellets in a foil pouch with no
name or logos from a local reefer. The Clown seems to like
the Formula One much better than the pellets.
Our Squamosa Clam gets fed live Phytoplankton that we purchased
from Marine Depot. Some local fish stores stock live Phytoplankton,
but ours doesn't. I dose approximately 3ml of live Phytoplankton
twice weekly.
Our Bubble Tip Anenome gets fed once a week or so a small
piece of seafood. So far we have fed shrimp, scallops, and
Formula One. It seems to eat them all, but spits out the shrimp
pieces after many hours. It does not spit out the scallops
or formula one.
Products
We Use
All
Glass Mini-Bow Aquarium
Tropic Marin Sea Salt
Frozen Formula One (red)
Custom Sea Life Power Compact Lighting
Whisper HOB Filters
MiniJet Powerheads
Tronic Heaters
Salifert Calcium Test Kits (Calcium, Alkalinity)
Aquarium
Pharmaceuticals Test Kits (Nitrite, Nitrate, PH)
Marine Depot Refractometer
Boyd Enterprises Chemi Clean
Krylon Spraypaints
Zap Gel
|
|
|
